Thursday 31 January 2013

Cool stripes.......

I'm a big fan of noro wool, and the self-striping of this one accentuates the simple pattern:

It is pattern number 2 from this huge set of patterns:
http://issuu.com/talpa/docs/262_patrones_crochet?mode=mobile

Wednesday 30 January 2013

I can't believe it's not knitting......

I can't believe I have nearly made it to the end of the first month, 30 days done only 335 to go! There have been times when I've wondered if I will be able to complete this project as 365 squares seems like a lot, but then I find interesting new patterns like this one:
It was worked in rows using a mix of stitches including some front post treble crochets for the raised bits!
The original pattern is number 19 in this post:
http://www.mypicot.com/beta/crochet_patterns_simple_textured.html#

Tuesday 29 January 2013

Not quite as simple as it seems......

I started this pattern thinking it looked straight forward, little did I realise that it would need some folding to make up the central shape before putting on the border. The instructions (link below) told me exactly what to do but it still seemed to take a while before mine looked anything like the pattern - maybe it has something to do with me being left-handed and the pattern being completed by a right-handed person. I persevered and eventually worked it out, I'm really happy with the final result:
The original pattern can be found here:
http://home.comcast.net/~gandal195/pinwheelstar.html
(When linking from Pinterest this suggests it is 'inappropriate', but it doesn't seem to be!)

Monday 28 January 2013

A repeated pattern......

Today's square is a repeat of the square from day 19, but by alternating the colours it give a very different effect:
The pattern for this square can be found here:
http://web.archive.org/web/20031213114801/http://members.aol.com/lffunt/mazegs.htm

Sunday 27 January 2013

The best yet?

In my opinion this is the best square I have created so far in this project:
It looks really classy and wasn't actually that difficult to make. I can see me making many more of these!
The original pattern can be found on ravelry, a link to this is below:
http://www.ravelry.com/patterns/library/simple-10-petal-afghan-square

Saturday 26 January 2013

A lovely lacy square.......

Open squares like this take up little yarn and look really pretty, I'm not sure how easy it will be to link to other more traditional squares though - time for a bit of experimentation I think!

When I saw this pattern on Pinterest I thought it looked great, I was really disappointed when I clicked on the link to discover it was in Japanese. If you click on the bottom link on the page however it brings you through to a stitch diagram which is easy to follow:
http://www.rakuten.co.jp/gosyo/461397/713923/870239/870859/

Friday 25 January 2013

Roll on spring.......

After a week of doing battle with snow and ice I thought a spring flower was in order, bring on the warmer weather.
I really like the 3D effect of this one with the individual petals.

The link to the original pattern can be found here:

I used a standard granny square round the outside and then finished up off with a round of double crochets in a contrasting colour.

Thursday 24 January 2013

A red silk flower square.......

One of the things I'm most enjoying about this project is the opportunity to use up all the odd bits of wool I have left over from other projects. Today's square is made from a gorgeous deep red chunky silk yarn that I used to make a cowl last winter:

The original pattern can be found here:
http://www.crochetspot.com/crochet-pattern-granny-square-with-a-flower/
I'm hoping it will become properly square at the corners when I join it to the others!

Wednesday 23 January 2013

Crocheting with ribbon.....

I bought this ribbon at a craft show a couple of years ago because it was so lovely, the problem was what to do with it. I have created a very simple square which shows off the sparkle in the ribbon to good effect (look at the full size image to see what I mean):
This was worked in rows of treble crochets. Create a foundation chain, add 3 extra chains for the first treble crochet, work a treble crochet in each chain (starting in the 4th chain from the hook). Start each fresh row with 3 chains as the first treble crochet.
I haven't ended this one off yet as I don't think this square will fit in with the blanket I hope to make from all these squares I am making, it will probably end up as a scarf of some sort!!

Tuesday 22 January 2013

Working in rows......

Most of the squares I have made so far have been done in rounds, this one is made working from side to side:
Each row includes four and a half 'shells'. The start of each row is 3 chains (counts as 1 treble crochet), 2 treble crochets are then worked in the stitch at the base of the 3 chains, skip two chains and work a double crochet in the next chain, this is a half shell. Whole shells are completed by skipping two chains and then working five treble crochets in the next chain, skip two chains and work a double crochet in the next chain. Continue across the row of chains finishing with a double crochet in the last chain.
Subsequent rows are worked in the same way. Each row starts with a half shell (double crochet in the middle treble of the last shell on the previous row), whole shells are worked by doing five treble crochets in the double crochet from the previous row and the double crochet is worked in the central treble crochet from the shell on the previous row.
I have edged it with a round of double crochets, as usual, to finish it off and make it easier to join to other squares.

Monday 21 January 2013

A ribbed square......

This is another twist on a classic square:
It is essentially the same pattern as day 7, but rather than working ordinary treble crochets on each round I alternated front post treble crochets and back post treble crochets. In each corner space I added two treble crochets, two chains, two treble crochets. I then finished it off with a round of double crochets to give a neat edge.

One really good thing about this square is that it looks the same on both sides.

Sunday 20 January 2013

Filling in the gaps......

I saw a picture of this square on Pinterest, it didn't have a pattern to go with it but I thought I'd give it a go anyway:
It's just like a traditional granny square but with all of the holes filled in.

Rounds 1 and 2 are done in the same colour, following the granny square pattern (day 1), end off this colour and join in the second colour.
Round 3 - 3 double crochets in the corner space, 3 double crochets in the top of each treble crochet from round 2, in the chain space do 3 double treble crochets in the top of each treble crochet from round 1. Continue in this fashion all the way round, join the round with a slip stitch and end off this colour.
Round 4 - join in the next colour. In the corner double crochets do 2 triple crochets in the first stitch, triple crochet 1 chain triple crochet in the second stitch and 2 triple crochets in the third stitch. 2 chains, miss next 3 stitches, 3 treble crochets in the double treble stitches from round 3. Continue this pattern all the way round.

(As always this is in UK terms)

Repeat rounds 3 and 4 until the square is the size you want, ending with round 3. I have edged mine with a round of double crochets to finish it off.

Saturday 19 January 2013

A new twist on an old favourite.....

This square takes the traditional granny square and adds some extra interest by the use of front post triple crochet (FPTC) stitches in the centre of each set of 3 triple crochets:
The original pattern can be found here:
http://www.crochetville.org/forum/showpost.php?p=2244036&postcount=1
I have edged my square with a round of double crochets to tidy it up.

Friday 18 January 2013

A pretty scalloped pattern.....

We've had a half day today because of the snow, this has given me a chance to try out a new pattern:
The original pattern can be found at the link below:
http://www.crochetville.org/forum/showthread.php?t=126468
I really like the raised effect of the back post double crochet stitch (BPDC).
I didn't complete as many rounds as in the pattern, might have to make this pattern again but larger.

Thursday 17 January 2013

Wednesday 16 January 2013

Following a diagram.......

Today I have made the square version of yesterday's African flower hexagon:
I followed this pattern:
http://lanasyovillos.com/grannys/african_cuadrado
Whilst it is in a foreign language the diagram is pretty easy to follow, mine could do with blocking out to try and make it sit flat however. Aside from that I'm pretty happy with how it has turned out.

Tuesday 15 January 2013

Not technically a square......

My first non-square granny square, I love the pattern in this one:
The wool was bought in a great little wool shop in Edinburgh just off Grassmarket, it was one of those 'no idea what I'm going to do with it but it's too lovely to leave in the shop' moments. The current plan is to make quite a number of these hexagons and join them together to make covers for the seat pads on our dining room chairs - I'll post pictures if it comes off!!

The pattern for this hexagon can be found here:
http://plus3crochet.blogspot.ca/2011/08/african-flower-dishcloth-pattern.html?m=1
(I only did 2 rounds after the initial flower and then edged it with a round of double crochets)

Monday 14 January 2013

Textures..........

I saw this pattern on a friend's Pinterest board and thought it looked great and having never completed a textured pattern in crochet I thought I'd give it a go:
The original pattern includes stripes of different colours, mine uses graded wool. It gives a series of bobbles - this doesn't come across very well in this photo however.
The original pattern can be found here:
http://www.mooglyblog.com/free-pattern-blackberry-salad-striped-baby-blanket/

Sunday 13 January 2013

Finally the second blanket is finished.......

After a week of going round and round and round and round I have finally finished the second baby blanket for my friend that is expecting twins:
I've edged it with one round of double crochets just to finish it off, and if I do say so myself I'm rather pleased with the outcome.

Saturday 12 January 2013

Something bright.......

A brightly coloured square for a grey Saturday morning:
This is made using the same pattern as the one used on day 7, however at the end of each round the yarn is cut and woven in and new yarn is joined in for the next round.

Friday 11 January 2013

Working diagonally.......

Today's square is something different for me - it is worked diagonally, increasing each row until the piece is as big as necessary and then decreasing each row to make it square. It gives a textured square, the patterned wool giving extra interest:

The pattern for this square can be found here:
http://www.ravelry.com/patterns/library/corner-start-afghan

Thursday 10 January 2013

A combination of two simple squares.....

Today's square is a combination of the basic granny square and rounds of triple crochets:
It starts with 3 rounds of a basic granny square (day 1) and is then followed by 3 rounds of treble crochets as in the square from day 7.

Wednesday 9 January 2013

Something completely different.......

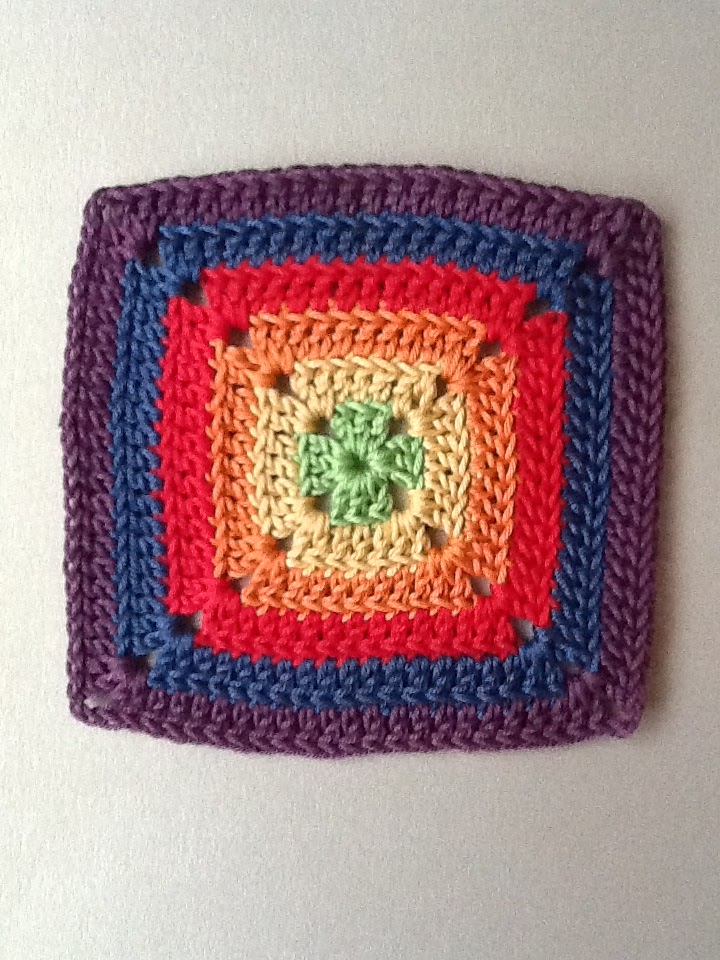
I'm a big fan of squares with a variety of stitches/patterns provided they don't get too complicated, this is one based on a central flower:

Chain 5, make a ring with a slip stitch.
Chain 5, * 3 treble crochets, 2 chains, repeat 3 times, 2 treble crochets, join with a slip stitch round initial 5 chains.
Chain 3, 8 treble crochets in first corner space, 9 treble crochets in each of remaining 3 corner spaces, join with a slip stitch in third of the chains.
Slip stitch in next two treble crochets, chain 3, treble crochet in 5th treble from previous round, chain 3, slip stitch in final 2 trebles, double crochet in central space, repeat on each corner, join with a slip stitch.
2 chains, double crochet in each stitch round to corner, double crochet, 2 chains, double crochet in the treble from previous round, repeat on each edge, join with a slip stitch.
4 chains, miss one double crochet, treble crochet, *1 chain, miss one double crochet, treble crochet repeat from *, at corners do 2 treble crochets 3 chains, two treble crochets then continue with previous pattern.
I then did two rounds of double crochets to finish off - making it the required size.

Hope this makes sense, it's more complicated than I thought!

Tuesday 8 January 2013

A new favourite.......

This is my new favourite crochet stitch:
It's very straight forward, wonderfully stretchy and ideal for jumpers, socks, scarfs etc. This square has been made with a wool that stripes naturally which I think adds to this simple design.

Start with a foundation chain of whatever length you require - my square is 32 chains long.
Do a double crochet in the second chain from the hook, 1 chain, *double crochet missing a stitch in the foundation chain, 1 chain repeat from * to the end of the foundation chain.
*1 chain, double crochet in the chain space of the previous row, repeat from * to final chain space, 1 chain, double crochet in the chain at the start of the previous row.
Repeat the row until the piece is the length you require.

Monday 7 January 2013

Time for something a little bit different.....

I'm still ploughing my way through the very large granny square for the second baby blanket, but it'll be a few days before that's finished so I thought today I would make a slight variation on the basic square:

This one is just as easy to make as a traditional square but comes out with less holes!

Start with a ring of 5 chains joined with a slip stitch.
3 chains, 2 treble crochets, *2 chains, 3 treble crochets, repeat from * 3 times, 2 chains, finish round with a slip stitch in the third of the initial 3 chains of this round.
3 chains, treble crochet in each stitch from previous round, when you reach a corner do 2 treble crochets, 2 chains, 2 treble crochets in the corner space. At the end of the round join with a slip stitch in the third of the initial 3 chains of this round.
Repeat this as many times as necessary to get the size you want.

Sunday 6 January 2013

Time to start the second blanket........

I've decided the second blanket will be one large granny square, the four colours being used on each round in turn. I've made a start, but I think this may take some time to complete with each round taking longer than the last!

About 30 rounds in total should do it.......

Saturday 5 January 2013

The finished article.......

Here is the finished first blanket:
I'm really pleased with how this has turned out, so simple to make using only very basic granny squares and some double crochets to join and edge them.
Now to make a start on the second blanket in these colours.......

Friday 4 January 2013

Almost done.....

I've had a busy few days making multiple granny squares and now there's just one more in mint green to go!
I've started to join the squares together using double crochets in cream and once all the squares have been joined I plan to edge the blanket in double crochets all the way round. Hopefully I will get the blanket finished in time for tomorrow's post........

Thursday 3 January 2013

And the final colour.....

So this one in baby blue is the third and final colour for the first baby blanket, now I have to make multiples of each - 9 of the multi-coloured, 8 in green and 8 in blue will make a 5 X 5 blanket the perfect size for a cot or pram.
The first of 8 in baby blue.

Wednesday 2 January 2013

More of the same.......

As a friend is expecting twin boys a couple of baby blankets are in order - I plan to make two in the same colours but in different designs, the same but different! So today was an opportunity to make more basic granny squares (same pattern as yesterday) in a different colour, this one contains shades of green, blue, cream and grey/brown - ideal to blend with mint green square I made yesterday and some baby blue squares.
Today's square.

Getting Started........

So 2013 has arrived and with it a whole load of new year's resolutions. Mine is to crochet a granny square a day for the next 365 days (ok, so they might not all be squares but you get the general idea!)

As most of today has been spent recovering from the excesses of last night I thought I should start with something simple - a traditional granny square.

Chain 5, join to form a ring.
Chain 5 (this is the final treble crochet of the round and two chains in a corner), * 3 treble crochets, 2 chains, repeat from * twice more, 2 treble crochets. Join to the initial chain of 5 with a slip stitch. You should now have your square shape comprising four sets of treble crochets separated by chains at the corners.
Chain 5, * 3 treble crochets, chain 1, 3 treble crochets, chain 2, repeat from * twice more, 3 treble crochets, chain 1, 2 treble crochets. Join to the initial chain of 5 with a slip stitch.
Repeat the round as many times as you like (I did 6 rounds in total), each round will include 1 more set of 3 treble crochets, chain 1.........

One thing I always find annoying when looking at instructions is when they don't state if it is British or American - these are British treble crochets!
The finished square.